How to Transfer Files Between Computers with GoMyid
Plan remote file transfers, confirm source and destination, handle file versions, verify results, and recover from interruptions with a clear workflow.
GoMyid ·
Remote file transfer sounds straightforward: choose a file, send it, and open it on the other computer. Most mistakes happen around that simple sequence rather than inside it. The wrong folder is selected, an older document replaces a newer one, or a useful support copy stays on a shared laptop long after the task ends. A good transfer process makes the source, destination, and expected result visible before anything moves.
Send and Receive: the exact Windows transfer sequence
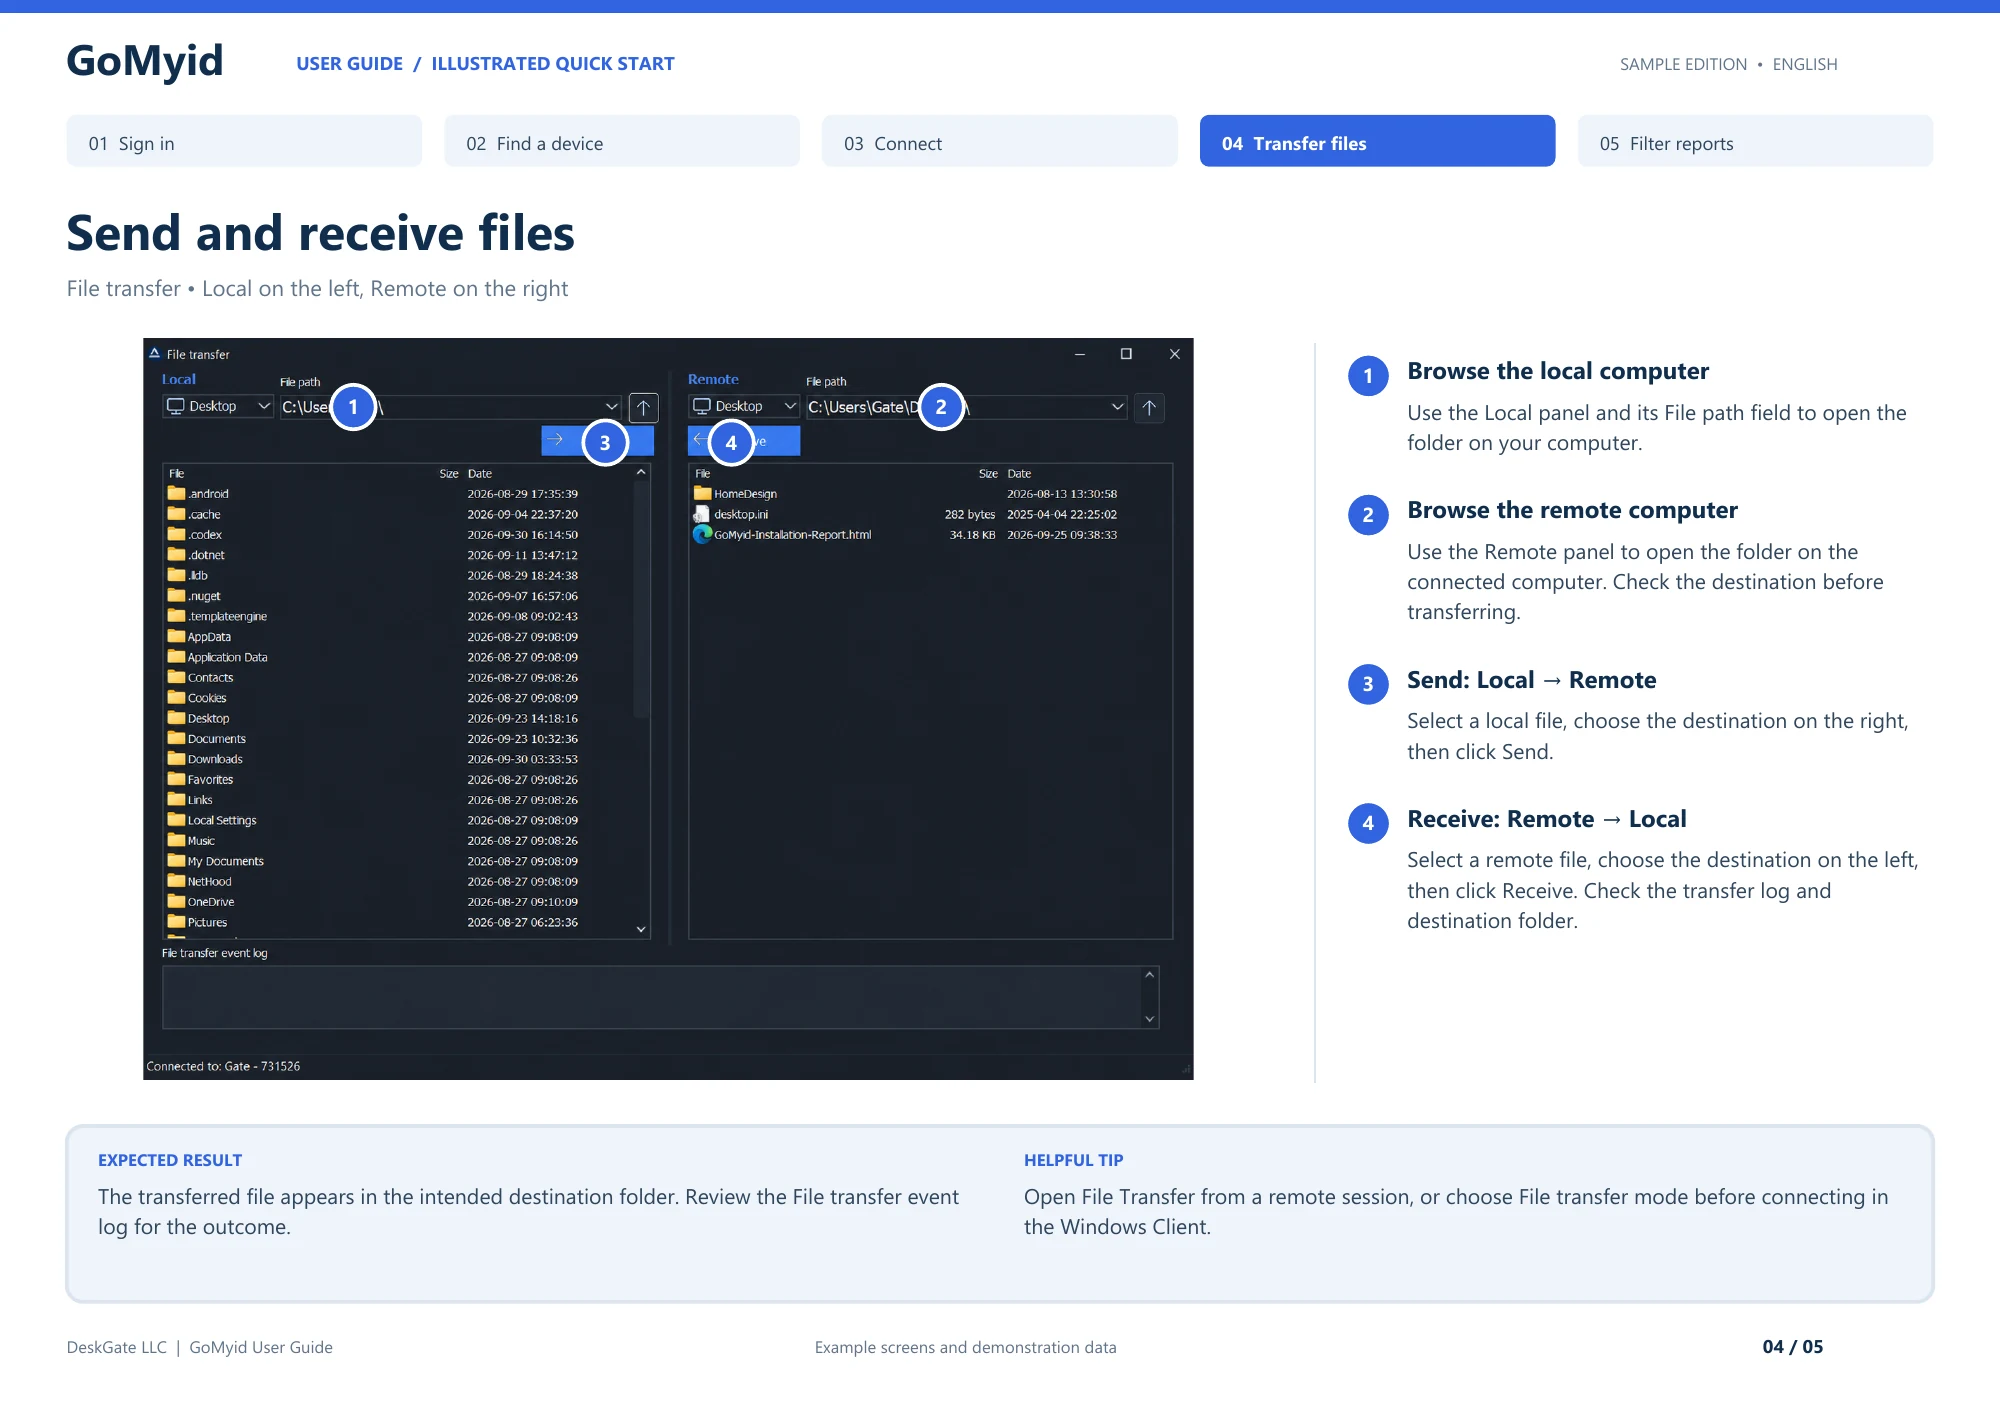
In the documented Windows transfer view, Local is on the left and Remote is on the right. Send and Receive name opposite directions from the connecting computer's perspective. Use the following sequence instead of guessing from an arrow or a remembered folder name.
- Open File Transfer from a remote session, or choose File transfer mode before connecting in the Windows client.
- Use the Local panel's File path field to open the folder on your computer.
- Open the intended folder in the Remote panel and confirm which side will receive the copy.
- For Local → Remote, select the local file, choose the right-hand destination, and click Send.
- For Remote → Local, select the remote file, choose the left-hand destination, and click Receive.
- Check the File transfer event log and inspect the destination folder.
The expected result is the selected file in the agreed folder, not merely an entry appearing in the event log. Open the resulting document when appropriate and confirm its version with the recipient. This final check catches a correctly completed transfer of the wrong source file as well as an incorrect destination choice.
Decide whether you need to transfer the file at all
Opening a document through a remote desktop session and copying it to your local computer are different actions. If the goal is to check a setting or read a value, the document may be able to remain where it is. A transfer is useful when the destination actually needs its own copy, such as an approved document being delivered to a colleague or a configuration file being placed in a specific folder.
Write down the reason for the copy in one sentence. "Send the final invoice to the accounting workstation" gives you a destination and a purpose. "Grab everything in this folder" does not. Narrowing the task helps you avoid unnecessary files and makes the completion check much easier. You know what should arrive and who should be able to use it.
For company information, confirm that the destination is appropriate before starting. A borrowed computer or personal phone may not be the right place for a business document. The connection being authorized does not automatically settle the handling of every file visible through it. If the task can be completed without creating another copy, that may be the cleaner workflow.
Identify the source and destination explicitly
The source is the location you are copying from. The destination is where the new copy should appear. Those definitions sound obvious until two people describe the same connection from opposite ends. Your "local" computer may be the other person's "remote" computer in conversation. Use device names and folder paths when clarity matters.
In GoMyid's illustrated Windows transfer window, Local and Remote areas are displayed separately. Read the labels from the perspective of the client you are operating. Check the path in each area before choosing the action. A familiar folder name such as Desktop or Downloads can exist on both sides, so the folder name alone is not enough to establish the destination.
Before transferring, say the direction out loud or put it in the support note: "Copy this file from the office workstation to the approved folder on the support laptop." That sentence exposes misunderstandings while they are still easy to fix. It also helps the person receiving assistance understand where their information is going rather than watching an unexplained progress indicator.
Prepare the files before connecting
Confirm the exact file name and version. If several documents have similar names, open the intended source and check its contents before sending it. A file called Final is not necessarily the newest version, and a recent timestamp does not prove that its contents are correct. Use the project's normal version convention when one exists.
Save the source document through its application before transferring. If another person is actively editing it, coordinate the timing so the copy represents the intended state. For files that belong to a running application, follow that application's guidance rather than assuming that copying a visible file produces a complete, usable backup. Ordinary document transfer and application recovery are different jobs.
Choose a destination folder that the recipient can find and use. Confirm that it is appropriate for the file and that the intended user has access. Avoid choosing a system folder merely because it is visible in the transfer window. If the task requires an administrative location, make that part of the approved work and verify the requirements before beginning.
Understand the GoMyid transfer workflow
The GoMyid Windows client offers File transfer alongside Full control and Command in the connection area shown in the product overview. A focused transfer mode can be useful when the job does not require navigating the entire desktop. It keeps attention on the two file locations and the operation between them.
Confirm the remote device and complete the authentication or approval required by your configured workflow. Then inspect the Local and Remote panes. The overview shows path fields, file lists, and Send and Receive controls. Before using a control, confirm its direction in the current context. Do not rely only on where a button sits or the direction you remember from a different tool.
Start with one intended file when you are learning the interface. Verify the destination after the operation before expanding to a larger group. This small first transfer gives you evidence that the paths and direction are correct. It is easier to inspect one result than to untangle a large batch sent to the wrong folder.
The Windows transfer section introduces the same layout in the context of a remote support session. If you need help establishing the connection first, use the destination-identification steps before returning to the file task.
Keep names and versions understandable
A useful file name helps the recipient recognize the document without opening several alternatives. Follow an existing naming convention rather than inventing a new one during support. If no convention exists, include the meaningful subject and a clear version or date when appropriate. Avoid names that depend on private context only the sender understands.
Do not rename a file simply to make a transfer succeed unless you understand how it will be used afterward. Some workflows expect a specific name, and changing it can break the next step even though the copy arrives correctly. For an ordinary document, a distinct working-copy name may be helpful. For an application configuration file, the required name may be part of the task.
When several people are editing, decide who owns the authoritative version. A transfer can create two plausible copies without resolving which one should receive future changes. Tell the recipient whether the file is for review, replacement, reference, or continued editing. That instruction can prevent more confusion than any transfer setting.
Handle an existing destination file deliberately
If a matching file already exists, stop long enough to understand the prompt and the task. Replacing a file, keeping both copies, and canceling are different decisions. Do not choose the fastest button just to clear the dialog. Ask whether the destination contains work that is not present in the source you are sending.
For important files, follow the normal backup or versioning process before replacement. A remote file-transfer tool is not a substitute for that process. The fact that you can overwrite a file says nothing about whether you can recover its previous contents. Make recovery part of the plan when a replacement could affect ongoing work.
After resolving the conflict, verify the result in the destination folder. Confirm the expected name and contents, especially if the operation created a renamed copy. Tell the recipient which file to use. Leaving two similar documents without explanation can make the next person choose the wrong one even when the transfer itself was technically successful.
Verify the result, not just the progress indicator
Completion begins with the application reporting that the operation finished, but it should not end there. Look in the agreed destination and confirm that the expected file is present. If the task involves an ordinary document, open it with the appropriate application and check a recognizable part of its contents. Make sure the recipient can use it under their own account when that matters.
Check the properties that are relevant to the work. A document's title or a known revision may be more meaningful than its size alone. Two different versions can have similar sizes, and a successful copy can still be the wrong source file. Choose a verification that answers the actual question: did the intended recipient get the intended material in a usable form?
For a business support request, record the source, destination, and outcome without copying private content into the ticket unnecessarily. A short note can state that the approved file arrived and was opened successfully. If verification is incomplete, say what remains. Do not mark a transfer successful merely because the sender's window no longer shows activity.
Plan larger transfers around the workday
Before a larger transfer, consider the available connection, destination storage, and whether either computer will remain available. A laptop about to leave the office is not a dependable destination for a long operation. Agree on a time when the work will not compete with a more important task or be interrupted by an expected restart.
Avoid promising a completion time from a nominal internet speed alone. Actual transfer behavior depends on both devices, the connection path, current activity, and the product's workflow. Observe a representative operation and communicate uncertainty honestly. If the transfer is still progressing, distinguish that from a frozen interface or an explicit error.
Break a complex delivery into understandable groups when the workflow permits it. That can make verification and recovery easier than treating an entire directory tree as one undifferentiated task. Keep a record of which groups were completed, and avoid restarting completed work unnecessarily. The aim is an auditable result, not the largest possible selection in a single operation.
Recover from an interrupted transfer carefully
If the session drops, first establish what the application reported and what is present at the destination. Do not assume that the file is complete or that nothing arrived. Inspect the state before retrying. A second attempt may encounter an existing file, and the right response depends on whether that file is usable and whether the source has changed.
Use the product's supported recovery behavior for your installed version. Do not assume that a transfer automatically resumes from the interruption point. If the interface offers a retry or continuation option, understand what it will do. When the behavior is unclear, use a controlled approach that preserves the known good source and avoids accidental replacement of unrelated files.
After recovery, repeat the destination verification. An operation that succeeded on the second attempt still needs the same result check as an uninterrupted transfer. If failures recur, record the exact message, timing, and connection conditions. The connection-drop checklist can help separate application, power, and network causes.
Understand permission and destination errors
An access error may refer to the source, the destination, or the account under which an operation is being performed. Read the message and identify which location is involved. The ability to view a folder does not necessarily mean you can write to it. Likewise, a remote desktop session being authorized does not grant permission to every file on the computer.
Check whether the chosen folder is the intended one and whether the recipient's normal workflow allows writing there. If a different approved folder would meet the task, use it deliberately rather than changing broad permissions. If the required location is protected, involve the appropriate administrator and follow the organization's process.
Avoid treating permission errors as reasons to disable security software or open access to everyone. Those changes can outlast the transfer and affect other users. Resolve the specific requirement instead. If an application keeps the file in use, coordinate with its owner and follow its guidance before attempting another copy or replacement.
Clean up working copies after the task
Decide which copies should remain. A support technician may have needed a temporary document to diagnose a problem, while the user may only need the final version on their own workstation. Leaving every intermediate copy in place creates uncertainty later. Use the organization's normal retention and cleanup process, and do not delete the only verified copy before confirming the final destination.
Review shared support devices especially carefully. A file in a convenient local folder may be visible to a later user or included in another workflow. Store necessary records in the intended location rather than relying on a technician's desktop as an informal archive. For personal support, explain what was copied and where the remaining copy can be found.
End the connection and review any saved access separately from file cleanup. Deleting a working document does not remove the ability to reconnect, and disconnecting does not remove copied files. The access-ending checklist covers that second part of a clean support handoff.
Make transfers repeatable for a support team
Agree on a small set of conventions: how a request identifies the file, how the destination is confirmed, how conflicts are handled, and what counts as a verified result. Keep the instructions short enough to use during a call. A process that requires a long explanation every time will be replaced by individual habits.
Train operators with harmless files and recognizable names. Ask the recipient to confirm the destination rather than letting the operator infer it silently. Practice an existing-file conflict and an interrupted session in a controlled setting. The point is to understand the decision process before important information is involved, not to accumulate test data on production computers.
For a larger environment, combine the transfer process with device ownership and support records. Knowing which station belongs to which branch reduces destination mistakes. The small-business device-directory guide explains how to keep that context useful as the number of computers grows.
Frequently asked questions
Do I need a full desktop session to move a file?
Not always. GoMyid's Windows overview shows a dedicated File transfer mode alongside desktop control. Use the mode supported by your deployment that fits the task. A focused transfer workflow can make the source and destination easier to see, while a desktop session may be useful for checking the resulting document with the remote user.
What do Local and Remote mean in the transfer window?
They identify the two ends from the perspective of the client you are operating. Local refers to your side; Remote refers to the connected destination. Confirm the actual paths as well as the labels. Two computers can both have folders called Desktop or Downloads, which is why a familiar folder name is not enough by itself.
Should I delete the source after sending the file?
Only if that is part of the agreed workflow and the destination has been verified. Copying and moving are different intentions. Do not remove a useful original merely to avoid duplicates without understanding who needs it. For company records, follow the established ownership and retention process rather than making that decision during a support call.
What if a file with the same name is already there?
Check whether it contains newer or different work before replacing it. Read the application's options and choose the one that matches the task. If you keep both copies, make their purposes clear to the recipient. The important outcome is not simply resolving the prompt; it is leaving the correct file available for the next person who uses it.
How do I know a transfer really worked?
Confirm that the application finished the operation, inspect the destination, and verify the file's relevant contents or use. For a normal document, opening it with the recipient is often a practical check. A progress bar alone cannot tell you whether you selected the right version or whether the recipient can access the destination folder.
Can I use the same process from Android?
The same source, destination, permission, and verification questions apply. GoMyid's Android overview includes a transfer control, but follow the workflow available in your installed version. Be deliberate about mobile storage and whether a copy is needed on the phone. The Android file-handling section explains those additional considerations.
Interface reference: GoMyid User Guide, page 4: Send and receive files. This article uses the documented example interface; it does not report a live deployment test.